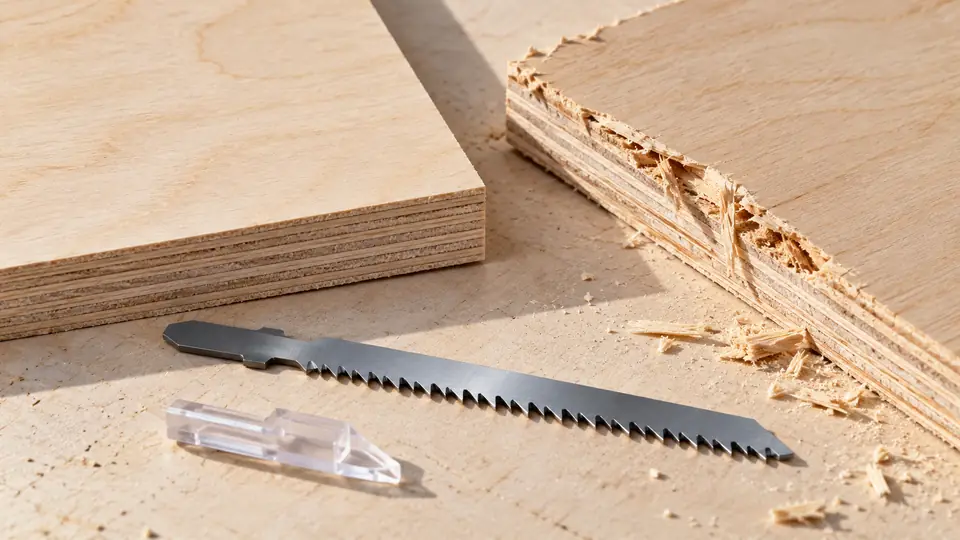
Reduce jigsaw tear-out by matching tooth direction to the visible face, supporting the fibers or coating near the cut and using a sharp blade rated for the material. Keep the shoe stable and test the complete setup on an offcut. No single tooth pattern or strip of tape guarantees a clean result on every board. If your current blade leaves a rough visible edge, compare jigsaw blades for cleaner cuts around the material, thickness and face you need to preserve.
Set Up a Cleaner Cut
- Identify the visible face and confirm the blade’s tooth direction before orienting the board. Keep the layout matched to that orientation.
- Disconnect power, fit a sharp compatible blade rated for the material and check the shoe and any permitted splinter insert.
- Clamp the retained piece and support the waste, leaving the full underside blade route clear of supports and fixings.
- Make a representative trial using appropriate speed and orbital controls. Inspect both faces rather than judging the upper line alone.
- Correct one observed cause of damage at a time. Stop and reassess if the saw bounces, the blade binds or the underside drifts.
Find Where the Teeth Leave the Surface
A conventional up-cut blade generally cuts on the upward stroke. The upper face is the tooth-exit side and can be vulnerable to breakout. A reverse-tooth blade changes that relationship, often helping a finished upper face while changing the forces you feel at the saw. Opposing or specialized tooth patterns need their own application instructions. Do not decide the board orientation from the blade’s brand or color. Inspect the actual tooth direction and read the package.
| Blade or setup | What it changes | What to check on a trial cut |
|---|---|---|
| Conventional up-cut teeth | Main cutting action toward the shoe | Upper-face chipping and underside finish |
| Reverse teeth | Main cutting action away from the shoe | Shoe stability and lower-face breakout |
| Specialized opposing teeth | Cutting action arranged for a named application | Both faces at the actual board thickness |
| Close-fitting splinter insert | Supports material near the blade slot | Insert compatibility and permitted blade geometry |
| Sacrificial support | Supports an otherwise exposed face | Clamping, extra thickness and blade clearance |
Establish Which Face Actually Matters
Label the face that will remain visible before turning the board over. For a cabinet panel, that may be the front; for a reversible shelf, both faces may matter. The layout must follow that orientation too. Transferring a curve to the back without checking handedness can produce a clean edge on the wrong side of a mirrored shape.
Inspect the actual blade rather than assuming all wood blades cut upward. Specialized patterns can behave differently and may have thickness or operating restrictions. Read the manufacturer’s face-orientation guidance and reproduce it on a trial piece. This gives a clearer decision than automatically placing every decorative face down or treating every reverse blade as a universal finish solution.
Reverse-Cut Blades Need a Stable Shoe
Our reverse-cut jigsaw blades guide helps identify blades intended for the visible-face problem. Choose one rated for the board, and check its limitations for thickness, curves and bevels. A reverse-cutting action can tend to push the saw away from the work. Maintain controlled contact as instructed by the saw and blade manufacturers. If the tool begins bouncing, stop and correct the support, setting or blade choice rather than pressing harder into an unstable cut.
Support the Retained Piece and the Waste
A clean tooth exit cannot compensate for an offcut that drops away and tears the last section. Place supports so both parts remain stable while leaving the moving blade clear. Keep clamps out of the shoe’s route and check the underside before starting. A sacrificial backing can help support an exposed surface, but it adds material to the cut. Recheck blade reach, tool capacity and clamping. Tape can make a line easier to mark or help hold loose surface fibers, but it is not a replacement for support or a suitable blade. Test adhesive on a hidden area if the surface is delicate.
Locate the Moment the Waste Becomes Unstable
A small offcut beside a straight edge may need simple support. A large internal cutout can become unstable as its last connection narrows. Plan that final stage before starting, including where the saw will stop and how the waste remains controlled. Keep supports and fasteners away from the blade route, and never rely on catching the piece underneath a running saw.
If the last corner tears away despite an otherwise clean cut, inspect that sequence first. The blade may have been suitable throughout, with the damage occurring only when the waste moved. Changing to finer teeth will not reliably correct a falling offcut. Stabilize the assembly, then evaluate whether any remaining chipping comes from tooth exit or blade wear.
Use the Right Splinter Guard
A jigsaw splinter insert fits closely around the blade at the shoe. Its purpose is to support the surface near the cut. It must match the saw or base, blade and cutting arrangement. A splinter strip designed for a guide rail is a different accessory. Compare jigsaw splinter guards by exact compatibility. Check restrictions for bevel cuts and tooth patterns before installing one. A damaged or poorly fitted insert can obstruct the blade instead of helping the edge.
Check the Insert at the Actual Cutting Angle
A close-fitting insert works only in the configuration for which it is designed. The permitted blade thickness, tooth pattern or bevel position can be limited. Check the accessory instructions before combining a new blade with an old insert, and replace an insert that is damaged or no longer fits as specified.
Disconnect power before installing or inspecting it. Confirm the required clearance without reaching near a moving blade. If an insert obstructs the cutting arrangement, remove it only as the manufacturer permits and choose another appropriate support strategy. Do not enlarge or force a component merely to keep a familiar accessory in place.
Coated Boards Need a Two-Face Check
Melamine and decorative laminates can chip even when the core cuts readily. Decide whether one face or both faces remain visible. Use jigsaw blades for melamine for the coating and board combination, then compare the top and bottom of a trial cut. For a laminate-countertop cutout, the waste support and final corners also matter. For fitting cuts in laminate and vinyl flooring, check the exact plank core before transferring a method from one material to another.
Diagnose the Mark, Then Change One Variable
If chipping appears mainly on one face, inspect tooth direction and surface support. If the edge worsens during the cut, inspect blade wear, trapped debris and an offcut that is beginning to move. If the top looks clean but the edge slopes, address deflection rather than tooth-exit chipping. Make one change at a time on scrap: blade, orientation, orbital setting or support. Record which combination gives an acceptable visible edge. That is a more useful setup than automatically choosing the finest teeth or the highest speed.
Separate Chipping, Burning and a Sloped Edge
Chipping is missing material at an edge. Darkening or rubbing marks suggest a different problem, while a sloped edge can indicate deflection or an incorrect shoe setting. More than one defect can occur in the same cut, so describe what you see before choosing the correction. A cleaner top face does not prove the blade remained square through the thickness.
Keep a small comparison strip from trial cuts and label the blade and orientation. Adjust one relevant factor, inspect both faces and retain the result that meets the project requirement. This avoids a cycle of changing speed, orbital action, support and blade together without learning which change helped. Stop once the required finish is achieved; further changes can introduce a new problem.
