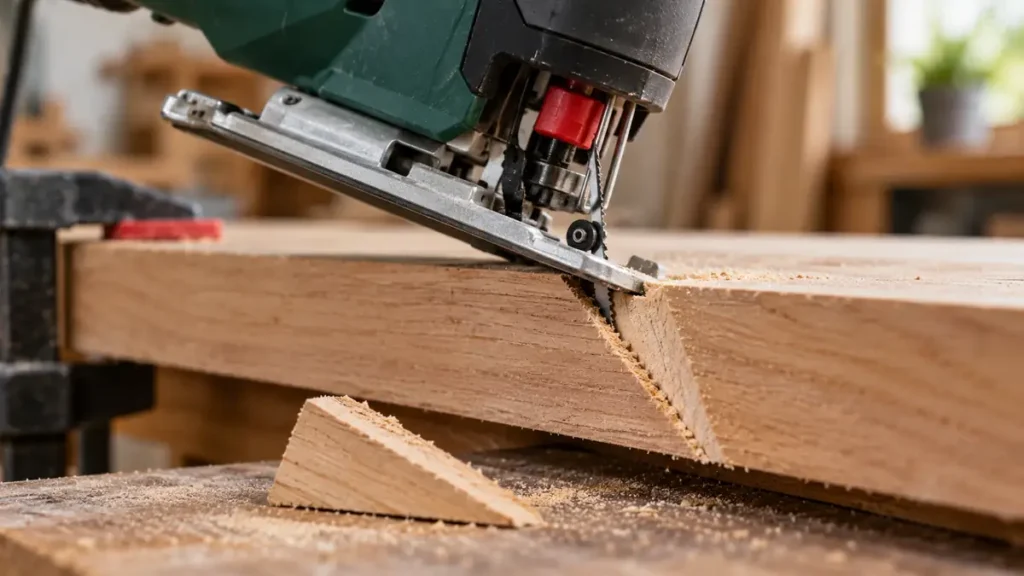
To make a bevel cut with a jigsaw, tilt the tool’s baseplate to the required angle, lock the adjustment securely, and guide the saw through a firmly supported workpiece with the baseplate held flat against the surface. Verify the angle with a bevel gauge or square before cutting the finished part. A marked 45-degree stop is convenient, but it may not produce an exact 45-degree cut without checking.
Bevel cuts place greater sideways load on the blade than ordinary square cuts. A suitable blade, steady feed pressure, and full baseplate contact help limit wandering and blade deflection. The exact adjustment method varies among jigsaws, so follow the tool’s manual when releasing, positioning, and locking the baseplate.
For repeated angled work, compare the bevel adjustment and control features in these woodworking jigsaws for repeated angled cuts.
What You Need for a Jigsaw Bevel Cut
- A jigsaw with an adjustable baseplate or shoe
- A compatible blade intended for the workpiece material
- A pencil or marking knife
- A square, bevel gauge, or digital angle gauge
- Clamps and a stable work surface
- A straightedge or compatible guide, if the cut must follow a straight path
- Scrap material that matches the finished workpiece
- Eye protection and any material-specific protective equipment
Check the jigsaw’s documented bevel range before planning the cut. Many adjustable models can tilt in one or both directions, but the available angles, detents, and locking mechanisms differ. Some baseplates require a hex key or screwdriver, while others use a lever.
How to Make Bevel Cuts With a Jigsaw
- Choose the blade. Select a blade that fits the jigsaw’s clamping system and is intended for the material. For straight bevel cuts in wood, a relatively rigid blade is generally easier to control than a narrow scrolling blade. Confirm that its working length provides clearance through the material during the full stroke.
- Disconnect the power. Unplug a corded jigsaw or remove the battery from a cordless model before installing the blade or changing the baseplate angle. Wait for the mechanism to stop and allow a recently used blade to cool before handling it.
- Install and inspect the blade. Insert the blade according to the manufacturer’s instructions. Confirm that it is fully seated, locked in the blade clamp, and correctly positioned at the guide roller where applicable. Replace a bent, dull, or damaged blade.
- Mark the cut. Mark the intended edge of the bevel on the appropriate face of the workpiece. The lower edge of an angled cut will not be directly beneath the upper cut line. Confirm which side is the waste side before starting.
- Support and clamp the workpiece. Place the material on a stable surface with open clearance below the entire blade path. Arrange the clamps so the jigsaw can complete the cut without hitting them. Support both the main workpiece and any large offcut that could fall, pinch the blade, or tear away near the end.
- Set the baseplate angle. Release the bevel lock using the procedure specified for the tool. Tilt the baseplate to the desired angle, then tighten or lock it securely. Never adjust the baseplate while the jigsaw is running.
- Verify the setting. Check the angle between the blade and baseplate with an appropriate gauge while the tool is disconnected. Keep fingers away from the blade teeth. Detents can speed up setup, but a test cut provides a more useful check of the resulting angle.
- Set the controls. Choose speed and orbital-action settings that suit the blade, material, and required finish. Lower or straight orbital action often provides more controlled cutting than an aggressive setting. Control labels and selector positions vary, so use the recommendations in the tool and blade documentation.
- Make a test cut. Cut a matching piece of scrap, then inspect the bevel with a square or angle gauge. Check the full cut face, since the top edge can follow the line while the lower part of the blade deflects. Readjust the baseplate if necessary.
- Start the finished cut. Position the front of the baseplate on the workpiece with the blade clear of the edge. Start the jigsaw and allow it to reach the selected operating speed before feeding the blade into the material.
- Guide the jigsaw steadily. Keep the baseplate flat against the workpiece throughout the cut. Apply gentle forward pressure and let the blade remove the material. Do not twist the saw, push it sideways, or force it forward to correct a wandering cut.
- Finish and shut down. Support the offcut as the cut reaches the end without placing a hand near or beneath the blade path. Release the trigger or switch, wait for the blade to stop, and then lift or set down the tool as directed by its manufacturer.
Account for the Bevel’s Offset
A bevel angle changes where the blade exits the underside of the material. At steeper angles or through thicker stock, the difference between the top and bottom edges becomes more pronounced. This affects layout, guide placement, blade clearance, and the amount of material left on the finished side.
Marking only the visible top edge can lead to a part that is narrower than intended. Draw the cut orientation on the end of the workpiece when possible. This makes the finished side and waste side easier to identify before the saw starts.
The tilted baseplate may also occupy a different position than it does at a square setting. Check that clamps, bench edges, and guides leave enough room for the motor housing and baseplate to pass.
Use a Straightedge Without Forcing the Saw
A clamped straightedge can help keep the baseplate moving along a consistent path. Measure the distance from the blade to the guiding edge of the tilted baseplate, then position the straightedge that distance from the cut line. Make this measurement at the selected bevel angle rather than relying on the tool’s square-cut position.
Before switching on the jigsaw, slide the disconnected tool along the setup to check clearance. The straightedge must contact a stable portion of the baseplate without interfering with the blade, housing, or adjustment mechanism.
A guide controls the direction of the saw body, but it cannot prevent every angled or wavy cut surface. The blade can still deflect in thick or dense material. If the blade begins to wander, stop and identify the cause rather than pressing the saw harder against the guide.
How to Improve Bevel Accuracy
Use a Stiff, Undamaged Blade
Thin or narrow blades can flex under the sideways load created by a bevel cut. A blade intended for straight cutting is usually more stable, provided it is compatible with the jigsaw and material. Blade suitability involves more than the shank. Tooth geometry, blade construction, width, thickness, and usable length all affect the cut.
For a bevel in wood, compare wood-cutting jigsaw blades with sufficient working length and stiffness for the angle.
An angled edge can start with blade deflection; the guide to why a blade bends or deflects helps separate blade and setup problems.
Reduce Feed Pressure
Excessive forward pressure is a common source of blade deflection. The upper edge may remain on the line while the lower edge bends toward the waste or finished side. Slowing the feed gives the teeth time to cut and reduces the temptation to steer the blade sideways.
Keep the Baseplate Fully Supported
The baseplate should stay flat on the workpiece from the beginning of the cut to the end. Rocking or lifting the tool changes the cutting geometry and can create an inconsistent bevel. Extra care is needed near an edge, where less material is available to support the shoe.
Check the Guide Roller and Bevel Lock
With the tool disconnected, inspect the blade clamp, guide roller, and baseplate lock for visible looseness, damage, or debris. A baseplate that moves under cutting pressure cannot hold a consistent angle. Follow the manufacturer’s cleaning or service instructions. Suspected internal faults or damaged adjustment parts should be handled through approved service procedures.
Test the Complete Setup
A gauge can confirm the static relationship between the blade and baseplate, but a scrap cut reveals how the blade behaves in the actual material. Use the same blade, bevel angle, material thickness, control settings, and feed approach planned for the finished part.
Use the checks for matching the blade to the material and cut before setting the final bevel angle.
Choosing the Cut Face and Managing Tear-Out
Jigsaw blades are available with different tooth directions and geometries. The surface most vulnerable to tear-out depends partly on which direction the teeth cut. Many conventional blades cut on the upstroke, while reverse-tooth and other specialized designs behave differently.
Check the blade manufacturer’s markings rather than applying a universal face-up or face-down rule. A fine-finish blade, reduced orbital action, adequate support, and a compatible splinter guard may improve edge quality. None of these measures guarantees a chip-free bevel.
For veneered plywood or laminated material, make a scrap cut first. Confirm both the visible face quality and the angle before cutting the finished component. Masking tape may help protect a delicate surface from baseplate scuffs, but it does not replace correct blade selection or support.
Common Bevel-Cutting Problems
The Cut Angle Changes Along the Edge
Check whether the bevel lock is secure and the baseplate remains flat. Uneven support, rocking the tool, or forcing the blade can also change the cut face. Inspect the blade for damage and repeat the setup on scrap.
The Top Follows the Line but the Bottom Wanders
This usually indicates blade deflection. Possible contributors include excessive feed pressure, a flexible or dull blade, thick material, dense grain, or sideways steering. A straightedge alone will not correct deflection below the surface.
The Jigsaw Pulls Away From the Guide
Stop the saw and wait for the blade to stop before inspecting the setup. Confirm that the blade is suitable and properly installed, the guide is parallel to the intended path, and the baseplate has a stable contact edge. Do not force the saw sideways against the straightedge.
The Blade Binds Near the End
The offcut may be sagging and closing the kerf around the blade. Improve support on both sides while preserving open clearance beneath the blade. Large cutouts and heavy offcuts should be prevented from dropping unexpectedly.
Limits of Cutting Bevels With a Jigsaw
A jigsaw is useful for short bevel cuts, shaped edges, and work that requires a portable saw. Its narrow reciprocating blade can deflect, especially in thick stock. Long joinery cuts or edges requiring highly consistent angles may call for a different cutting method and suitable equipment.
Material thickness also reduces available clearance when the blade is tilted. Confirm that the blade extends safely through the underside of the workpiece throughout its stroke and that the planned cut remains within the documented capacities of both the jigsaw and blade. Total blade length is not the same as usable cutting length.
Bevel-Cutting Safety Checks
- Inspect the material for fasteners, wiring, or other hidden hazards before cutting.
- Disconnect power before changing the blade or adjusting the baseplate.
- Clamp the workpiece rather than holding a small part near the blade.
- Keep hands clear of the marked path and the blade beneath the workpiece.
- Wear eye protection and address dust or chip hazards for the material being cut.
- Manage a power cord so it cannot cross the cutting path.
- Do not remove guards or bypass protective components.
- Allow the blade to stop fully before setting the jigsaw down.
A clean bevel depends on three factors working together: an accurately locked baseplate, a suitable blade, and a controlled feed rate. Verify the angle on scrap, account for the lower edge of the cut, and keep the shoe firmly supported. These steps provide a more reliable result than trusting a detent or forcing the jigsaw to stay on the line.
